As a child, Easter was always a fun Holiday for me... I enjoyed dying Easter eggs or decorating them with my siblings. I contemplated doing my nails in different shades for Easter this year, but decided I wanted to do something sweet and bright - but not crazy... so I opted for a 2 color look. | | Products used:- Zoya opal (green / gold / opal flecks)
- Revlon Enchanting (purple)
- Love & beauty - no name (Coral)
- Top Coat: Sally Hansen Super Shine
I wanted my nails to kind of look like those Easter eggs that I did as a kid. I remember my parents getting a dye kit that had glitter in it and it kind of looked like this when I was done making my egg purple (because I love purple). | I love how simplistic they came out but still very cute and festive. And, I'm using a coral and white striped dress for Easter, so I thought this would offer a little pop to tie my outfit all together, without being too "color coordinated".
Wishing you all a fun filled day - no matter what religion you practice, enjoy our Sunday!
xoxo
Honey
I picked up some pretty awesome goodies this Month. I love a great deal but I especially love to find things I know I will make great use of. Check out my Collective haul including products from Forever 21, Walmart, Claires, Zoya and Too Faced.
As I was getting ready to head out to take care of the things I had planned on my list on Friday... I wanted to create a look that would easily take me from day to night - since I knew it was going to be a long day. Purple eye shadow looks are always a great go-to for me when I'm having days like this... because I can blend it out and if I want to add a more dramatic or smokey look later in the day - I can add a little more purple in the crease or outer v for some extra drama.
The photo taken above was taken at least 6 hours after I applied my makeup - the sun was already starting to set, because the weather was gloomy and it was raining. I love how well Tarte shadows hold up to the long wear as well as crazy days like the one I had when I wore this makeup look. Hours later and my makeup still hadn't budged one bit. I did reapply my lipstick through the day - but honestly, not much - because Milani color statement lipsticks are AWESOME and the new Hard Candy Gloss Sticks are wonderful as well. Check out the list of products below.
~ Products used ~
Primer: Tarte Smooth Operator
Shadows: Tarte Amazonian Clay shadows in - Gossip, Velvet, Skinny dip, bubble bath and tiramisu
Liner: Tarte Cashmere Waterproof Gliding Eye liner in Black (waterline/tight line and lower lash line) and Milani Ultra Fine Liquid Liner in Black Vinyl (upper lash line / winged liner)
Lashes/Mascara: Diorshow Maximizing Lash Primer, Urban Decay Super Curl Curling Mascara and Tarte Lights, Camera, Lashes
Lips: Hard Candy Gloss All Glossed Up Lipstain in Pout and Milani Color Statement Lipstick in Fruit Punch FTC: All products mentioned were purchased with my own money with exception to the lip products. Any opinion stated is my own and 100% honest and unbiased.
 © HoneygirlsWorld Just a little over a month ago I posted the following image on my Instagram and was super duper excited to be able to try it. L'Oreal Feria is one of my all time favorite brands for coloring my hair. The brand itself has always provided me with easy to use color and tools and I have been using Feria products for many years. As soon as I caught a glimpse of the commercial late one night, I had been checking my local Walmart and Walgreens consistently - awaiting its arrival. The Wild Ombre kits come in 3 different shades to customize a wide variety of hair colors: O60 Medium to Dark Brown (which is the one I ultimately decided to go with), O70 Dark Blonde to Light Brown and O80 Light to Medium Blonde. Depending on where you purchase the actual product - you can find them priced between $8.99 and $13.99. I have yet to find it any cheaper or any more than the prices I listed.
 copyright L'Oreal Paris USA 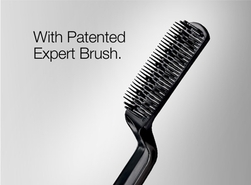 copyright L'Oreal Paris USA | L'Oreal states that the key to this "at home system" is their patented brush... which, honestly... I believe is probably one of the best inventions I have seen to date. Not to mention, the formulation of the Feria bleach works very quickly and lightened my hair tremendously in less than 30 minutes. |  Before Wild Ombre - My starting hair is Medium Brown with minimal highlights and lowlights |  After Wild Ombre - My end result was a gradient of blond, medium blond, red and medium brown | I filmed the application process as well as showed before and after in the video that is embedded below ( click here to watch on YouTube). If I were to decide to do ombre on my hair again, I would not hesitate to purchase this item again. It really was fool proof in my opinion. I have read a few reviews where others have said that they experienced dryness in their hair after use... but the addition of the coconut oil treatment that I do with my hair has really helped tremendously and my hair really is not as bad as it would normally be when I bleached it.  Before  © HoneygirlsWorld |  After | Check out my video and see how easy it was to use this product. All in all - I would definitely use this again - even if it wasn't for ombre and I was just interested in adding a little bit of highlights in my hair. The brush itself is an ingenius tool and as a L'Oreal Feria lover, this definitely was a great product. While I did mention that it can dry hair - with proper use, you can definitely achieve awesome results. FTC: The products discussed in this post were purchased by me with my own money. I was not paid or compensated in any way to provide this review and am not an affiliate with the company. My opinion is 100% honest, unbiased and my own.
Disclaimer of images: 2 images provided are from Loreal Paris USA. The copyright has been listed below each image. I am not claiming copyright in anyway and have used the images for informational purposes only.
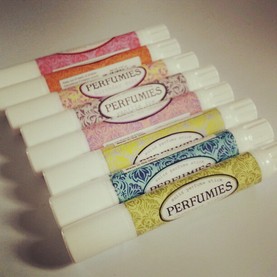 © 2013 HoneygirlsWorld I had the awesome opportunity to work with a company that offers a great product to perfume lovers like myself. I wish I knew of this company when I worked in the Corporate World... because it would have definitely come in handy with all the traveling I did... and I love that they offer such a huge variety of scents. Perfumies is an online shop - offering perfume sticks that are approved for airline travel and are convenient for taking with you on the go.
Each perfume stick from Perfumies cost just $7.00 and they are available in 95 seducing scents from Sweet and Fruity, to Floral and Sexy. They are perfect for those that love to smell awesome through out the day but don't enjoy carrying around their full sized (or even travel sized) perfume bottles, that are not only cumbersome to take along but they can cause a number of problems from spillage to bottles breaking. | Perfumies Solid Perfumes are All natural based. They are Paraben-free and do not contain preservatives. As an animal lover, I truly am a huge supporter of companies like Perfumies, that Never tested on animals. They take pride in their product, So you can smell pretty always.
I have been using Perfumies for the last month and have loved each scent that I have used... my favorite being the Birthday Cake - since we all know that I absolutely love Cake & Vanilla scents.
| 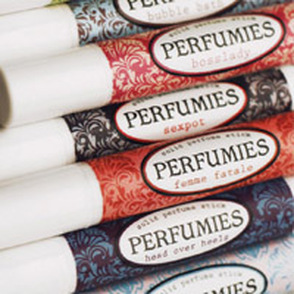 © Perfumies.com | The delectable scents that I received were: Birthday Cake, Buttercup, Cheek to Cheek, Forever Young, Champagne Wishes, Vanilla Ice, Kissing Bandit and Dreamsicle. So far the scents I have had the opportunity to use and absolutely love are - Birthday Cake, Buttercup, Cheek to Cheek, Vanilla Ice and Forever Young. The other 3 - Kissing Bandit, Dreamsicle and Champagne Wishes were reserved for a mini giveaway (details will be listed below as well as via the YouTube video description box). I love the fact that most of the scents are very universal - allowing the person who is looking for a special or favorite scent to choose something that they will enjoy wearing. The scent itself actually lasted about 2 - 3 hours and the scent lingered even longer depending on my body chemistry for that day. Applying the Perfumies Solid stick is as easy as I demonstrate in the video and even with daily use, I have yet to run low on the actual product amount as of yet. I also love the fact that I have left it in my big "car" bag several times in hot Hawaii weather and it has not melted or lost it scent, which is a really big deal since you cannot really leave a lipstick in a car and some perfumes can go quite rancid if left in the heat.  © Perfumies.com If there was a Con, which I actually don't have one per say... I would suggest that they include the actual base notes of the product on their label for each tube and scent, though - honestly, that would be my gripe with any perfume bottle / label because I always complain about that consistently with my favorite perfumes as well. Their website is easy to maneuver and all of the information you could possibly need to make your purchasing decision is listed on the website. Check out their website for notes on the various scents they have available and check out their awesome Gift Box Sets and Mini Sets that will suit any ones taste and affordability. Check out my embedded video below for more details and a demo on the products itself - or click here to watch. Giveaway details below. The Perfumies Mini Giveaway Rules: - You MUST be a Subscriber of my YouTube Channel - www.youtube.com/destne146
- Visit Perfumies.com and check out the scents they have available.
- Come back to my YouTube video (click on the link here to be taken to the video) and leave me a comment telling me what your favorite scent is from the Perfumies website.
- The winner will be selected via Classtools.net and will be announced here on my Blog.
- The Giveaway will run for 2 weeks (starts on March 28, 2013 and ends on April 11th, 2013.
- There will be 3 winners total and each winner will receive one (1) perfumies solid perfume stick. You will not be able to choose your scent.
A special thanks goes out to Perfumies.com for sending these awesome goodies for me to try out - I truly do love them and I will continue to be a customer for life <3 Honey
FTC: Products mentioned and discussed in this post and on the video were sent to me for review and consideration. I am not affiliated nor was I paid to review the products sent. My review is 100% honest and unbiased. ~Honey
Image Disclaimer: Some of the images provided in this post are from Perfumies.com - they own copyrights to all of their images from their site. One image is ©HoneygirlsWorld.com 2013.
This has been one of my favorite quotes for years and I still hold true to it. Wishing you all a wonderful and awesome Wednesday!
xoxo
Honey “Imperfection is beauty, madness is genius and it's better to be absolutely ridiculous than absolutely boring.” ― Marilyn Monroe
| | I came across this recipe in one of my Self.com emails and just had to share it. I have been told so many times that healthy food is just not tasty. Well, this salsa is not only healthy but includes awesome flavors to entice any food palate and satisfy many cravings. It includes a few of my favorite fruits and flavors to make any mouth water. Listed below are the ingredients and how to create this masterpiece. Thank you Self.com for sharing this! Bon Appetite! xoxo Honey | INGREDIENTS- Vegetable oil cooking spray
- 8 cups baby spinach
- 1 cup couscous
- 1 lb medium shrimp, shelled and deveined
- 1/2 cup chopped fresh cilantro, divided
- 1 tablespoon extra-virgin olive oil
- 3/4 teaspoon salt, divided
- 1 large mango, peeled and diced
- 1 medium avocado, diced
- 1 medium tomato, diced
- 1/4 cup chopped red onion
- 1/2 jalapeño chile, seeded and finely chopped
- 1 tablespoon fresh lime juice
PREPARATION- Heat grill. Fold four 18-inch-long pieces of foil in half; unfold and coat inside with cooking spray. Place 2 cups spinach in center of 1 half of each piece of foil. Combine couscous with 1/4 cup water; divide evenly among packets, placing on top of spinach. Combine shrimp, 1/4 cup cilantro, oil and 1/2 tsp salt in a bowl. Divide shrimp evenly among packets, placing next to couscous. Fold foil to close and crimp edges to seal; place on grill; close lid; cook until packets are fully puffed, 10 minutes. Combine remaining 1/4 cup cilantro with remaining 1/4 tsp salt, mango, avocado, tomato, onion, jalapeño and lime juice in a bowl. Carefully cut foil to open; stir contents; garnish with salsa before serving.
THE SKINNY - 397 calories per serving, 10 g fat (1 g saturated), 52 g carbs, 8 g fiber, 25 g protein
Last night for dinner (pictured on the left above), I combined my homemade Alfredo Sauce (minus the cream cheese), which you can find here along with my homemade Pesto (pictured above on the Right). I was asked several times for the recipe, but realized I did not have it - so instead of doing a recipe on my Alfredo/Pesto, I figured I would share the Alfredo recipe and then add my Pesto recipe and you can combine them together. So - here is my Pesto recipe, Enjoy! Ingredients / Supplies needed:- About 3 Tablespoons of chopped/minced garlic (about 9 cloves if using fresh)
- 6 cups Fresh basil leaves - make sure you are packing them into the cups
- Kosher Salt or Garlic Salt & Pepper - I like to add these to taste, but on average you are using approximately 1 Teaspoon.
- Great Quality Olive Oil - I will use approximately 1 3/4 cup
- 1 cup fo freshly grated Parmesan cheese - if you don't have fresh, use deli parmesan cheese, it will make all the difference, compared to the regular bag cheese you get in the store.
- About 1/4 - 1/2 cup pine nuts
- If you are looking for a little extra crunch... you can add in Walnuts. About 1/4 of a cup.
- You can also opt in to add a tad bit of nutmeg - just a pinch for some added flavor.
Directions and what to do:- Pull out your food processor or magic bullet. I use my Ninja.
- Place the Nuts of your choice and garlic into the food processor bowl / unit. If you want a little bit of extra nuttiness, you can opt to use both pine nuts and walnuts. I omit the walnuts because I've been allergic to them most of my life - while I am no longer allergic, I'm a creature of habit.
- Process for 30 seconds.
- Stop the processor and add in your basil leaves and seasoning (salt & pepper).
- Then turn on processor and while running slowly pour in your olive oil. If you have a Ninja or bullet like I do. I like to put in a little bit of the oil, process for a second and then consistently stopping and adding in the oil. It can be a pain in the butt, but it works the same. If I'm using my Food Processor, I will add through the tube a little at a time while processor is on.
- Continue until the pesto is a nice puree, everything will be well combined and fine.
- Add the parmesan and puree again, about a minute.
- You can serve cold or warm over pasta or use as a dip
- Store your pesto in the fridge or freezer - but make sure that you put a drizzle of olive oil on top so there is a thin layer on the top. (It will not only help in preservation, but keep it nice and smooth (got that tip on Food network. lol)
If you use or share this recipe, please be sure to link back to my post and give credit.
To make the homemade Alfredo / Pesto Sauce, simply make your Alfredo Sauce and then as it comes to the point just before serving, scoop in approximately 1/2 cup of the homemade Pesto. Stir until combined and serve with your favorite pasta. You can easily feed a family of 5 with the recipes provided.
I can't believe how fast the weeks have been flying by. I especially can't believe last week, which was my son's Spring Break... had basically left in a blink of the eye. Seriously, I wish Spring Break would be longer so we could accomplish everything on our bucket list. In just 2 days - my son goes back to school. I'm so happy and lucky however, that we had such a great week... I love spending time with my husband and sons.
So - again, as I am catching up on my weekly posts, it's Monday and I'm blogging like crazy. I can't believe I forgot to do my Sunday Letters yesterday, but considering all I accomplished with the boys through the day - I know why I didn't find the time. From Spring Cleaning and cleaning out their room - it was definitely a heckteck day. Regardless, I still wanted to get in my Sunday letters... so here they are, on a Monday! See below! Dear Spring Break... Well, it's time to bid you a fine farewell. I wish you had stayed longer and that you came during the time of year when we had a little more sun so we could enjoy it much more. But, nonetheless... I was happy to have you around as were the rest of my family and we are glad we got to spend much needed family time together, because of you. Come back soon! <3
My Darling Sons... I always enjoy spending time with you and I'm so lucky that I can work from home and have this very important time with each of you. It was a great Spring Break. I think we accomplished a fair amount and most importantly... we got to spend time with one another. Love you all!
To the Best Husband in the World... thank you for planning our Spring break time together. I really appreciate you taking the initiative. I love you unconditionally and enjoyed the extra time we got to spend with you this past week. Looking forward to our Family fun times again. <3 Love you!
To Spring... Hey there, where the heck are you? Don't get me wrong - I enjoy this rainy weather and I love that all the green around us is so lush and pretty... but I wish the weather would make up its mind so that we are not so indecisive when trying to plan for our day. Hmmm... maybe I should be writing to Mother Nature.
Dear Mother Nature... You are awesome and I thank you for all you have blessed us with weather wise. Please ensure summer is not too too hot and please bring spring here soon so we can enjoy the beautiful flowers. The jacarandas haven't even blossomed much up here yet. I'm looking forward to that soon.
Wishing everyone the best Spring ever.
xoxo
Honey
Ooh... a foodie post for my Work From Home Mommy Survival Guide, which I will shorten to call: WFHM-Survival Guide. I get asked all the time... how do you continue to cook a home cooked meal and still manage to work from home? The fact is - honestly, I truly do not know how I do it... but I do know that by adding Kid Friendly meals that can be cooked in 30 minutes or less really does help. And, of course - by Kid Friendly, that also means that from time to time, you can include your children in the prep work or cooking all together.
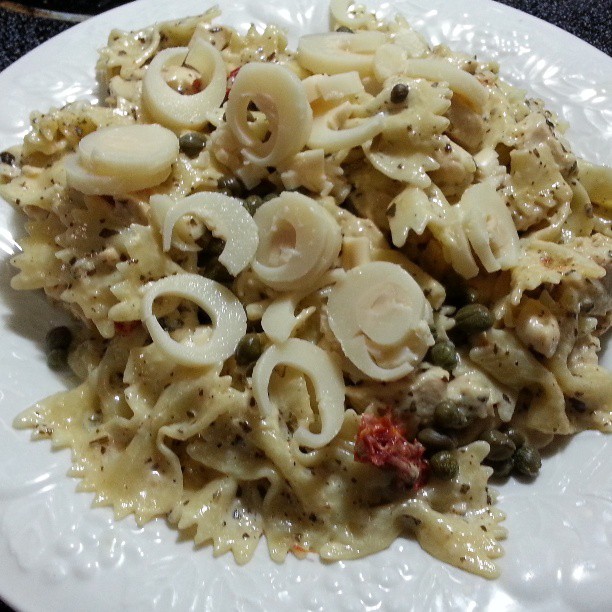
My boys love to eat and they love to be involved in the food preparation process, especially my eldest. Since he is now 9 years old, he is always eager to help out or even take charge in the kitchen from time to time. Just the other day - he volunteered to make me a sandwich since I had been working so hard that day. He made me a ham, turkey and roast beef sandwich with cheese on wheat toast. Kids love to help out and by giving them some direction and a little bit of guidance in the kitchen, the options are endless. | | A favorite in our house is Pasta. If you follow me on Instagram, you will see all the different pasta dishes I make. What makes them so delish and the fact that they are healthier than most is that my pasta dishes or sauces I shall say, are all made from scratch and are homemade recipes. If time is really in a crunch that day - I'll pull out my favorite Safeway Brand Pasta Sauce, which is not only affordable, but feeds a family of 5.
Children can be picky, so I love to create fun and brightly colored foods so that they will eat them and enjoy them. | I love a great pasta... so to add some texture as well as color and flavor, I love to sneak in some things like Capers and Sundried tomatoes, mushrooms and even zucchini and other veggies. The flavors come together well and the kids love the taste. It also allows them to get accustomed to certain flavors so when you try to feed it to them on a regular basis... they will recognize the flavor as something they enjoy. Even if cooking your meal (like pasta) from scratch, it literally can take the same amount of time as if you were doing so from the jar... and I love the fact that it gives my children a brighter and larger palette when it comes to food as well as the fact that you don't have as much or any preservatives when you are making your sauces from scratch. You can easily get a pasta dish on the table in less than 30 minutes if you are prepared and of course, your little helper can help you stir the pot too.
I'll have more of these posts and videos as well coming up that will show you how I prep easy snacks and meals for my kids for days we are on the go or just hanging out at the park.
| As you all know... I'm a curly haired, dyed haired beauty. And, I am always on the search for some miracle product that will keep my hair nice and soft and full of bouncy curls. When I first got site of Wen on an Infomercial about 2 years ago, I decided I would give it a try. I purchased several different products from them, The Wen Lavender Cleansing Conditioner (pictured to the right), The Wen Sweet Almond Mint Cleansing Conditioner, and the Wen Sweet Almond Mint Anti-Frizz Styling Cream. I paid roughly about $90 for a 90 day supply and by the time I received the products I was excited and had hoped that it was well worth it if it was actually going to work on my hair. Boy, was I wrong! |  Photo borrowed from Totalbeauty.com | The cleansing creams did not wash my hair or leave my hair soft - at all. It seemed like my hair that I had worked so hard on bringing back moisture and shine seemed to get dryer and even lost some of its natural curl. I felt like the cleansing conditioner didn't even clean my hair... which was not a good thing, considering I used cheap conditioner to cleanse my hair and it worked fine. I assumed that maybe it was just this formulation or that maybe it didn't work well because my hair was out of sorts due to weather, so I put it on the side and waited to work with it again in a month or so. I continued on to trying the Sweet Almond Mint products. I really enjoyed the smell, but that was the only positive to it all. The actual cleansing conditioner, again - made my hair dry and it lacked the moisture I would get from my Drug Store brand conditioner and/or shampoo. I had to use a ton of product to cleanse my hair, being that it was so long and thick... which I did not like, because in one use, I just about used half of the bottle it seemed like. I again, tried to be optimistic and said I would try it again and maybe it was just this instance. So I tried the Sweet Almond Mint Anti-Frizz Styling Cream, which I had hoped would at least tame some of my fly-aways and the dryness the conditioner left behind... but it really didn't do anything except make my hair kind of sticky. Instead of taming my hair, it kind of made my hair seem a little stiff and oily looking. I was so disappointed. Because I know that some hair products may have odd reactions with your hair the first few times, I continued to use the products for a month - rotating the conditioners and using along side some of my favorite hair care products. Nothing really changed from the first time I used them. My hair felt dry and even seemed like it got frizzier than normal. The smell was okay and didn't really smell bad at all - but honestly, that was the only thing I think really was appealing to me. After use, not only did my hair feel dry, lack moisture and gained extra frizz, I still felt like my scalp and hair was dirty and it even had a greasy feel to it. To top it all off... I noticed that I started to develop break outs near my hair line from using the products. It was a disaster because I had worked so hard to get my skin back in balance again and here comes a product I thought would be worth the hype and it just was one negative after another. I have been sitting on this review for about a year... and I know I should have done it sooner, and used my own photos... but I threw out the product and never looked back. The thing is - I'm a huge Infomercial addict... I love to check out the new inventions and I'm always eager to try out something new... but this was the biggest Regret of a buy that I have done in a long time. I vowed never to try any of their products again. And - sadly, the host of the informercial is one of my favorite actresses, Alyssa Milano. So I think that helped to get me excited about my purchase too... even if I know you can't always believe what you see on TV. While looking for other reviews on Wen today (since I knew I was about to get going on writing mine) - I came across some on Totalbeauty.com. I left the link for you to check out what the editors have to say about this product. If you have tried out Wen, I would love to hear your experience with the product as well. Leave in a comment or email me. :) I'm chucking this product line up as a huge FAIL in my book. If time permits, you may see a video from me regarding this. :) Happy Hair Love to all of you! xoxo Honey
| | I'm sure some of you may have seen this video that has since gone viral. My husband showed it to me the other night and I held on to the link for today's Music Monday. If you are a true lover of music, you will know that songs hold so many different meanings. In some songs, we may think that they are talking about sadness, but yet - they are talking about overcoming the bad and stepping into the brightness of their future... while other songs may be talking about adversity but all we hear is that it is about love. Songs by Bob Dylan were famous for its metaphors and many songs today I believe to have that same affect.
| I am a huge supporter of music, having come from a family that is very much musically inclined, my love for music (though I can't hold a tune to save my life. lol) goes very deep in my soul.
I wanted to share this particular cover because it really shows that even with all the Ethnicity battles our World deals with on a daily basis - two children, from different nationalities... can come together and sing and play music together. The song they chose... "We Found Love" which is one of Rihanna's popular song. This song brought two young children together. The funny thing is (while I let my brain analyze all of this) I honestly think "We Found Love" has a much deeper meaning in the words than what Rihanna's video portrays.
Rihanna's video details a couple whose love is kept together with their strange addiction of one another, whether induced by the inclusion of drugs or alcohol or not... it's one of those situations where the couple just loves one another, but being together brings out the worst in each person. While many can take different inspiration from the song - I have always considered it's meaning since I first heard this song and each relationship in it's own right... either is really good or really bad - regardless of what kind of relationship it is. I am not going to get into detail - but I just love that music brings all kinds of people together and embraces all kinds of thoughts and emotion. This definitely was an awesome Music Monday Share! I posted Rihanna's version below, if you want to see it!
Enjoy!
Honey
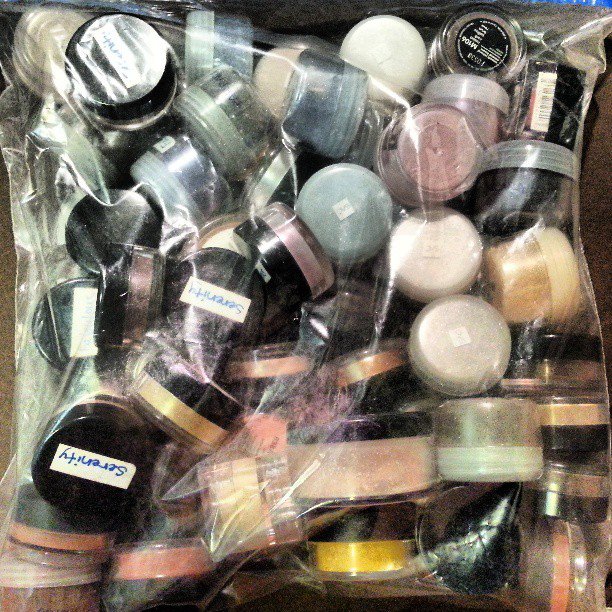
Back 2 Mac Empties
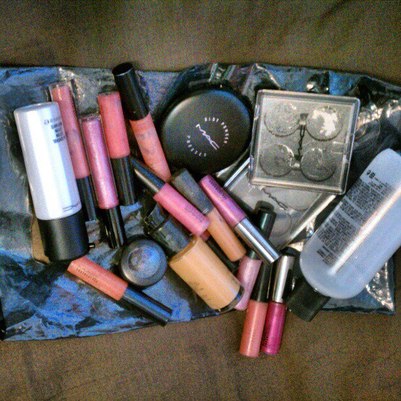
Spring cleaning in my house not only consists of cleaning the house, but also all of my makeup. I clean through my makeup several times a year - but during Spring is normally when I take in my Back 2 Mac Empties to trade in for new goodies and donate things like perfume samples, skin care samples and other to the local Women Helping Women Shelter. I also take out cosmetic items that are expired, or about to be, items I purchased but never really used and so much more and either donate them (if they are still usable and barely used or swatched) or throw them out.
I started with my Back 2 MAC Empties. Normally I keep an empty MAC bag from a past purchase and stuff them with my MAC products that are empty or expired. After 6 items, you can take them to a MAC counter for a free lipstick (limited edition colors not included) or a Free standing store for a free eye shadow, lip glass, lipstick with your trade in. MAC has an awesome program because they take the trade in returns and recycle them. I love this program not only because we are recycling - but it's always great to get back some goodies... you feel accomplished at the end. I honestly wish other places like Sephora, Urban Decay, Too Faced and so much more would provide a similar option. I have a lot of empties I have thrown out from them in the past.
Past Pigments from Bare Minerals, Avon Minerals and Mineral Makeup I created myself from way back in the day.
|

A bunch of makeup I am getting rid of from Avon eye shadow quads to mineral makeup, single eyeshadows and so much more!
| Now cleaning out makeup is not a "all in one day task". It has taken me several different times to really go and get everything organized and looking at expiration dates, averaging when I purchased the products and figuring out if it is something I will ever use again. Besides my MAC stuff, I have gone through my pigment drawer and cleaned out over 200 pigments. Some of them I bought from Bare Minerals or Avon but most of them are pigment colors I created myself. Minerals last a really long time and for most cases, indefinitely as long as they are kept sanitary and you are not dipping directly into your jar. I have been mixing pigments since about 2007 - providing colors I made for my brides and bridal parties as custom made colors just for them or even little touch up kits for them to use. Because of this, I have made many many colors. While HoneyXO only has about 86 colors, if I were to add up the colors I have made for clients over the years, I would have well over 250. My client colors were custom formulated for them, so I do not ever sell them and only used them for personal use. Since I will not be using them any longer, I figured it is time to get rid of them. That is 6 years worth of pigments right there... all stacked up on each other and in a huge zip lock bag... whew, it was nice to clear out 2 drawers of that stuff and make room for more makeup. lol
I also decided it was time to get rid of palettes I haven't used in a while or makeup that may be near expiration. Those are in the right photo. Single eye shadows and so much more have been tossed in there, never to be looked at again... off to see another life. Good bye! :) | | Last but not least... my lipstick drawers. I cleaned through those last month. The drawer on the left of the photo is what was left. The package on the right is what I am getting rid of, donating unused ones or just throwing out lipsticks all together. It was really nice to get all my lippies into one drawer again... though since Lipsticks and eye shadows are my weaknesses... I know that I will be filling up and over filling that drawer once again before years end. I know, I have a problem... but - at least I know when to throw things out. :) | I don't think collecting makeup is a bad thing... in fact, if it were - I'd be guilty of it. But, I do think that not getting rid of makeup you don't use or makeup that is old is a bad thing. I make it a regular ritual to go through my makeup at least every 6 months... and throw out the things that may be expired or no good... things like Mascara. As you know - I'm a mascara junkie anyway... so I pick them up pretty frequently. If they are not used up within 4 months, I usually throw them out. But I really do like cleaning through my makeup. I always preach that it should be a habit for women to go through their makeup, at least once a year and throw out the bad or get rid of what they don't use. That's why I LOVE makeup spring cleaning. It also gives me the opportunity to see makeup that I have neglected... and bring them to the front of my collection so I can utilize them more often and get the use out of them that they deserve. Do you Spring Clean your makeup?
Happy Spring Cleaning!
Honey
It's been a really long time since I last did a Restaurant review. I just really haven't had the chance to take the time and write my thoughts down in a while regarding the placed my hubby and I have been or those that we have taken the kiddos. On March 16th - I posted on my Instagram about being out with my hubby and kids and enjoying a great dinner. Let me start off by saying... any dinner with these guys make for a perfect night... because company is surely awesome - but the meal itself was pretty great as well. We had been over on the West side and decided since the day was coming to an end, that we would go and have dinner there as well. We stopped off at Fleetwood's, but they were serving Happy Hour and there was nothing that our sons could have an enjoy there, so we ventured over to The Melting Pot, to find out they had closed down the restaurant a lot sooner than I had expected. So... we decided we would head over to Mala (owned by Chef Mark Ellman). They also were serving Happy Hour and the hostess said that he had a very large party coming in. Because of this, he didn't want us to feel rushed. We decided that we would try out Honu Seafood & Pizza Restaurant for the first time, the sister Restaurant of Mala. Now, my hubby and I have eaten at Mala several times before... and we had hoped we would be dining at a similar flair. As we walked in - the decor was a bit different. In my opinion, in comparison to Mala, it looked a little more contemporary with a beach feel but I liked that it seemed much brighter on the inside than what Mala did. I liked the fact that when we walked in, we were greeted instantly and while it did not look like a "kid friendly" restaurant, my children were not treated as such. The Hostess was sweet to the boys and even reached behind her hostess counter and grabbed out 3 little turtles (honu in Hawaiian) and handed them to the boys. They were magnetic turtles and really not meant for children to play with because they were so fragile, but the fact that they did have that as well as crayons, coloring paper and a kids menu meant a lot to me. We were sat right on the ocean front, which the boys absolutely loved and our waitress came over quickly to let us know what they were serving. It was also Happy Hour here at Honu, so we ordered a pizza (the italian sausage - which is not pictured) and we waited while they started dinner so we could order off of the dinner menu.
Considering how the restaurant looked, they really were pretty kid friendly. The waitress was sweet, constantly accommodating the boys and the wait staff and bust boys were there every second the boys dropped something from the table... napkin, fork, toys. I really appreciated how polite they were and how the activeness of my sons did not get them frazzled, which can often happen in a restaurant that is much more upscale then say... A Dennys, IHOP or even Macaroni Grill. Because of that itself, dining there was pretty enjoyable.
Now - let's talk about food. We ordered a number of different things, the Italian Sausage Brick Oven Pizza (which we ordered for the kids to snack on), the Margherita Brick Oven Pizza (which we ordered for the kids to have as well as whatever was left to take home), The Ahi Bruscheta (which my hubby and I always get at Mala, so that was a must have), The Opakapaka Dore Style (which was my dish) and the Kobe Burger (which my husband ordered for him).
The pizzas were both delicious. I especially loved the fresh arugula with a drizzle of olive oil on the Italian Sausage Pizza ($19.00). It gave a bit of a bite from the arugula but an added freshness that made it pretty awesome. The italian sausage had great flavor and did not over power the cheese, which happens often when eating that type of pizza. We all enjoyed it. The Margherita pizza ($16.00) was also a hit, although the boys were pretty full by the time we started on it. We ended up taking home all but one slice - though it didn't make a difference because it was gone before the end of the night. I rather enjoyed that one the best, the crust was pretty good and I love Margherita style pizzas in general. It had San Marzano tomatoes, Fresh mozzarella and fresh basil. When we got home to eat it however, the basil tasted a litte stringy... though I attest that to being a few hours old.
Our Ahi Bruscheta ($27.00) is always a winner when we order it, so I'm not going to get into much detail about it except that if you eat at Mala or Honu, order it... you will love it! It includes Edamame puree (which is the only one I can say tastes just as good as mine), flax seed toast, Olowalu Tomatoes (island grown) and a 20 year old balsamic (which makes it awesome) - all topped with some greens and of course, fresh seared ahi tuna on top. Delish!
My dinner dish was just wonderful and I am working to perfect that cream sauce so I can recreate it: I had the Fresh Fish (Opakapaka) served Dore Style ($41.00) with capers, lemon, butter, dill pollen, vegetables and turkish quinoa. I love quinoa and it was absolutely wonderful... definitely a great dish choice if you are a fish lover like me.
My hubby had the Snake River Kobe Burger ($19.00). It was serviced with Apple Bacon, carmelized onions and frites and he chose white cheddar as his cheese. He did like it, but as a burger purest, he had wished he asked them to keep the onions off. He did order his burger medium rare and it came a little more on the medium well side - but for the most part, it was okay and he ate it.
All in all - it was a pretty enjoyable dining experience. The boys enjoyed themselves and we had a nice dinner out and enjoyed the time with one another. We will definitely visit Honu again and hopefully this time we will be able to see a turtle or two in the ocean near our table... which is why they called the restaurant Honu. That area is known to have turtles in the water consistently. Having grown up right across the street - I have seen many of them from the old Naoki's and Local Motion when I was a kid. Both of those places now no longer there and are the locations for Mala and Honu. The kids would have loved to see that so I'm sure we will make it that way again and enjoy another meal there.
I know this blog post was long - but I wanted to share with you the experience I had at what I think is a pretty great spot to visit if you haven't already. I enjoy doing my Restaurant reviews... and wanted to include Honu in that selection. All in all, they definitely get 5 Stars in my book and I'll be back again!
Bon Appetite,
Honey
If you've been watching my Vlogs this last week, you will see that we are celebrating because it is Spring Break... yay! My hubby took off a few extra days this past Saturday and Sunday, so we took the boys to Lahaina (the west side) and had some fun, ate out and even saw some whales. Days like this are few because my husband's schedule has him so far from home for over 10 hours a day (including his drive to and from work), so we look forward to his days off.
This past Wednesday, he surprised us and took us on a little drive. We headed towards the East coast of Maui into Hana and Haiku and stopped at a few places (you will see in the video) and just had a ton of fun. I truly enjoy these kinds of days... definitely days to "Cross off my Bucket List". Sometimes, the hustle and bustle of every day life has you so wrapped up in the busy days that you forget what surrounds you daily. And for me... I forget that I live in paradise. Having been born and raised in Hawaii and being that I have traveled to other places... sometimes I think Maui is definitely too slow for my liking. But it is nice to step away from my everyday and just smell the fresh clean air and feel the ocean breeze on my face. It is especially awesome to experience all of these things with those that I love with all my heart. | | I am looking forward to all the fun we can have during Summer Vacay... but for now, we have about 4 more days left of Spring Break and I am going to take all of it and embrace the fun. My hubby works the next 4 days so that means it is just me and my boys this weekend, but I have some fun times planned and look forward to all the fun we can have.
I hope you are seizing the moment... "Carpe Diem" so they say! I'll definitey be seizing my days! Enjoy your Spring Break! |
It's been such a crazy week this week and last. So much so, that I haven't had the opportunity to write my normal blog posts like my Throwback posts or just keep up with my usual one post a day that I have been doing so well on. But - that doesn't mean I'm going away altogether, I've just been enjoying Spring Break with my kiddos and having fun with my family. I figured I would share this with all of you... these are my Five Simple Rules for Happiness... though I'm sure each person will have a different set of rules. I try hard to keep to them but often times I know I can stray. I do know that Rule #1 definitely belongs there, because I hold true to the fact that I love with all my heart and definitely unconditionally. What are your rules? Don't have any, you say? Well, take the minute and try to jot some down. It really is something that I think will help to get you inspired and definitely Happy if you keep to them. I would love to know what your rules are, so share them with me. :) I'll be posting a video on this soon when time permits, I would love to share this with everyone from my Blogging family to YouTube. I think it is worth it. Wishing you all a wonderful Weekend!
I was inspired to do this week's style set because of the gorgeous platform wedges from Forever 21. I'm actually going to be getting those in the next week or so... they are on my wishlist. :)
Using those hot wedges as my inspiration - I decided I wanted this look to be very girlie and wanted it to have a Spring and Angelic twist to it. I did not want too many accessories to take away from the boldness of those wedges, so I opted for lace and a cute floral head band that would tie the whole look together. The gorgeous peach dress was a perfect fit and really added to girlie flare - making this look a go to for anyone during the spring. What I love the most is that the colors are a combination of warm and cool tones and it will match any skin tone and even any built. Someone with my built could rock this dress out like no other (snaps finger. lol)
I am not going to get into much detail and talk about the actual bag here in my blog - because I feel I got into enough detail in my video, which you can watch here (or embedded below). However, I will state that there were a few things I was not happy with this month and I hope that Ipsy takes some of this information and actually uses it to improve their future bags. I do for the most part like Ipsy and have enjoyed the products I received... but if this keeps up - I may have to quit as I mentioned in my video. So... to see what I'm talking about... watch my video :D
| | After I posted this pic on my instagram... I got so many compliments and requests for tutorial or recipe on how to create this. The problem is... I truly do not measure when I'm cooking things like stews or soups... everything is done by taste and eyeballing... though I know that I really should take the time to jot down specifics...
I always cook from the heart, so it can be a little difficult when it comes to recipes like this one. But, I'm going to give you the ingredients and the general run down. :) | The first thing you will want to do when making Corned Beef is to ensure that you cook it long enough till it is tender. If it is fresh corned beef and soaked in it's brine, you should already have it's seasoning that comes with it. There are several ways to do this... You can 1.) cook it in a stew pot for hours until it's tender or 2.) you can use a crock pot and let it go for a few hours. This meal is perfect for mothers who love crock pots because you can add all the veggies when you get home and pre cut everything. Once your corned beef is tender - you will want to have the following ingredients cut up and ready. I like to cut them up stew bite size: Potatoes, Carrots and Cabbage. Add Potatoes and Carrots in the pot like you would a stew. You can decide to add what ever flavoring you want at this point. I will either add a table spoon of Dijon mustard (or hold off till the end when I'm plating), but I always season with Salt, garlic salt and pepper as well as a little Onion powder. 10 minutes before the dish is to be served, add in your cabbage. I always hold off on cooking the cabbage with all of the ingredients till the end, because that way it will not upset your diners stomach. Cabbage can tend to cause a lot of gas in some people, so this will really help in that. You can also soak your cabbage in water for an hour to help as well. You can decide to drain the liquid and leave it as something chunky if you want as well. You will want to cook all of your veggies until they are fork tender and then serve.I like to serve my corned beef in a bowl over hot white rice and then take a spoon of dijon mustard and plop that on the top of it all. Whom ever is eating it can decide if they want to mix it in their entire meal (which is what I do) or use it as a little bit of dipping sauce. Bon Appetite! Supplies if cooking for 5 people: - 1 - Corned Beef Brisket. If you are planning to make this during St. Patrick's Day - you will find these on sale. I will usually buy between 2.50 and 3.00 lbs of brisket to feed 5 people.
- 3-5 Small / MediumYukon Gold potatoes (this way you do not need to peel them)
- 2 - Small / Medium Red potatoes (it adds to the flavor and gives your dish a little bit of a bite)
- 2 - Large carrots chopped or 1/2 of a bag of baby carrots (small bag) chopped
- 1/2 head - Cabbage (chop this up so that it is bite size
- Salt, Pepper and other flavors to taste
- Dijon Mustard, I love to use Grey Poupon
- White Rice (I normally cook about 3 cups of white rice for a party of 5-6 people)
I know this is not my usual type of recipes... but I figured I would share the best I could. I hope you enjoy this and if you try it yourself... please be sure to let me know. :) Bon Appetite and Best Wishes from my kitchen to yours!
It's absolutely no secret that the Urban Decay Naked Basics Palette has been a favorite of mine the last few months and it has been so because it is something I can turn to in a quick second and still manage to have myself done up and looking presentable in a matter of minutes. In my Get Ready with Me video (below) I take you through just a few quick and easy steps to create an eye look that will give you a very soft and sweet every day look using the Urban Decay Naked Basics Palette as the eyeshadows to create the look. This look is perfect for all eye colors, because it includes neutrals and browns... all of which are ashy or soft cream tones. The lip color can also be changed up to suit your taste and needs. In the photos - I did opt to add just a little more drama to the look by winging out my eye liner (as seen in both photos above), but you can leave your liner as you feel the need to and keep it as a tightlined/waterline look if you feel that is best. What I love most about this look is that it is perfect for mothers who are on the go like me and want to still look put together and polished. I have been doing this look for years... of course, using different products with similar color hues. This look has been what allowed me to get up and get ready for work that was located on the other side of the island (a 2 hour drive away). I did this look faithfully for 5 years when working on the other side, and it allowed me to look presentable, since I was in a Regional Role. While the tutorial / video seems fairly easy and simple... it definitely will make a whole lot of difference when it comes all together. Some of you may not have the UD Naked Basics Palette so here are some other products you can use with similar colors or that will provide similar results: The Balm Nude Tude Palette The Balm Meet Matte Nude Palette Wet n Wild Trio Palettes: Sweet As Candy, Silent Treatment, Walking on Eggshells Wet n Wild 6 Pan palettes: Greed, Vanity Wet n Wild 8 Pan Palettes: Sparkle Til Morning, Comfort Zone, Drinking a Glass of Shine NYX Nude on Nude Palette Milani Abstract Color Eye Shadow Palette Too Faced Glamour To Go 2 Palette ELF Quads in: Matte Mauve, Butternut, Brownstone Urban Decay Naked 1 or 2 Palettes Lorac Pro Palette I'm sure there are a ton more that you could use... but the ones mentioned are the ones that I have used in the past for similar 5 minute makeup looks. Some palettes have more shimmer while others include matte shadows. The options are endless and really if you have any colors that are similar, they will work just awesome. :) I hope you enjoyed this quick Get Ready With Me... I know the video is almost 10 minutes, but the look really takes about 5 minutes, I just talked through and showed you what to do, so it did take a little longer. Have fun and look awesome!
Don't you just love it when you find a video on your computer that you filmed and you forgot about? Yup... that's me and it happens often. I debated uploading this video, but I did it anyway. Check out my February Collective Haul... which includes Drug Store, Shop Lately, Hautelook and Ebay purchases. xoxo Honey Video below: http://www.youtube.com/watch?v=E1Uu_CMK7Ug
"Every great dream begins with a dreamer. Always remember, you have within you the strength, the patience, and the passion to reach for the stars to change the world."
~ Harriet Tubman
Have you ever had those days where you opened your eyes in the morning to start your day and you felt like it was time to do something new? Whether it be to read a new book, eat something different, change up your wardrobe... or just embrace your life and be You! Lately, I have been having those kinds of days... waking up to the sunshine and thinking to myself... "it's time for you to truly follow what is in your heart, instead of allowing the World to dictate who you are!"
Today - I woke up in a little bit of pain but I was so happy that I got to spend some time with my kiddos and I am super excited for Spring Break. I really decided that it is time for me to make that climb... and no matter how high the mountain, how hard the struggle... I know where I want to go and nothing will stop me.
I am lucky... in this life - I am joined by my husband, my best friend... who supports me in what ever en-devour or path I should take. It's because of his support that I can do the things I do and make the changes I make and it's because of his faith in me, I know that I will conquer no matter what. As I make my way through this week, I know that I have faith in my choices and I know that I will not steer me wrong. Sometimes, it takes a little faith in yourself to know that you can keep trying and keep moving, climb the highest mountain. Obstacles are just forks in the road, choose to go left or right... it's just another path taken.
Wishing you all a wonderful week filled with joy, happiness and love!
|


 RSS Feed